Tag: Tech Tuesday

Reunion: Finding A Couple’s Descendants Who Are Your DNA Matches Search Tip for Reunion Users

I’ve been a bit frustrated in my attempt to use Reunion to track my DNA matches. The problem? Trying to locate DNA matches in the database who descend from a specific couple. I’m pleased to say I found a solution, but also a bit embarrassed about how easy it turned out to be.

The Problem

I do most of my work identifying relationships with my DNA matches in Google Sheets. I have a master list and additional spreadsheets with subsets of individuals who form clusters for which I’m trying to identify our shared ancestor.

I build out pedigrees for my matches in Reunion. That way I can attach them to the correct ancestor once I get back far enough in their tree. The assumption, of course, is that I will actually get back to that shared ancestor. That’s not always the case, but I remain hopeful and keep trying.

The problem arises when I want to find those cousins who I’ve traced to a specific couple. Unless there’s only one of them, it can be confusing trying to descend the family tree. I wanted a quick way to see if I have added an individual to the database.1

The Solution

When I add my DNA matches in to Reunion, I tag them in two ways. First I check a “Flag” that I added—“DNA Match.” The flag will show if I’m looking at a person’s record in Reunion. Secondly, I select a “Child Status” that I created—“DNA Match.” This status I can see if I’m looking at their parents. Additionally, I add the match details into the notes field

I can easily find all my DNA matches in the database by selecting either of the tags in a search. What I was missing was a way to narrow it down to only those descended from a specific couple.

The solution, it turns out, was so simple, it made me feel stupid.

I usually keep all my direct ancestors “marked” in the database. It makes it easy to identify them out of a list of similarly named people without having to remember birth and death dates. The answer to my problem involved using marking a bit differently.

In order to find DNA matches who are descendants of a specific couple, the first step is to mark all their descendants in the Reunion database.
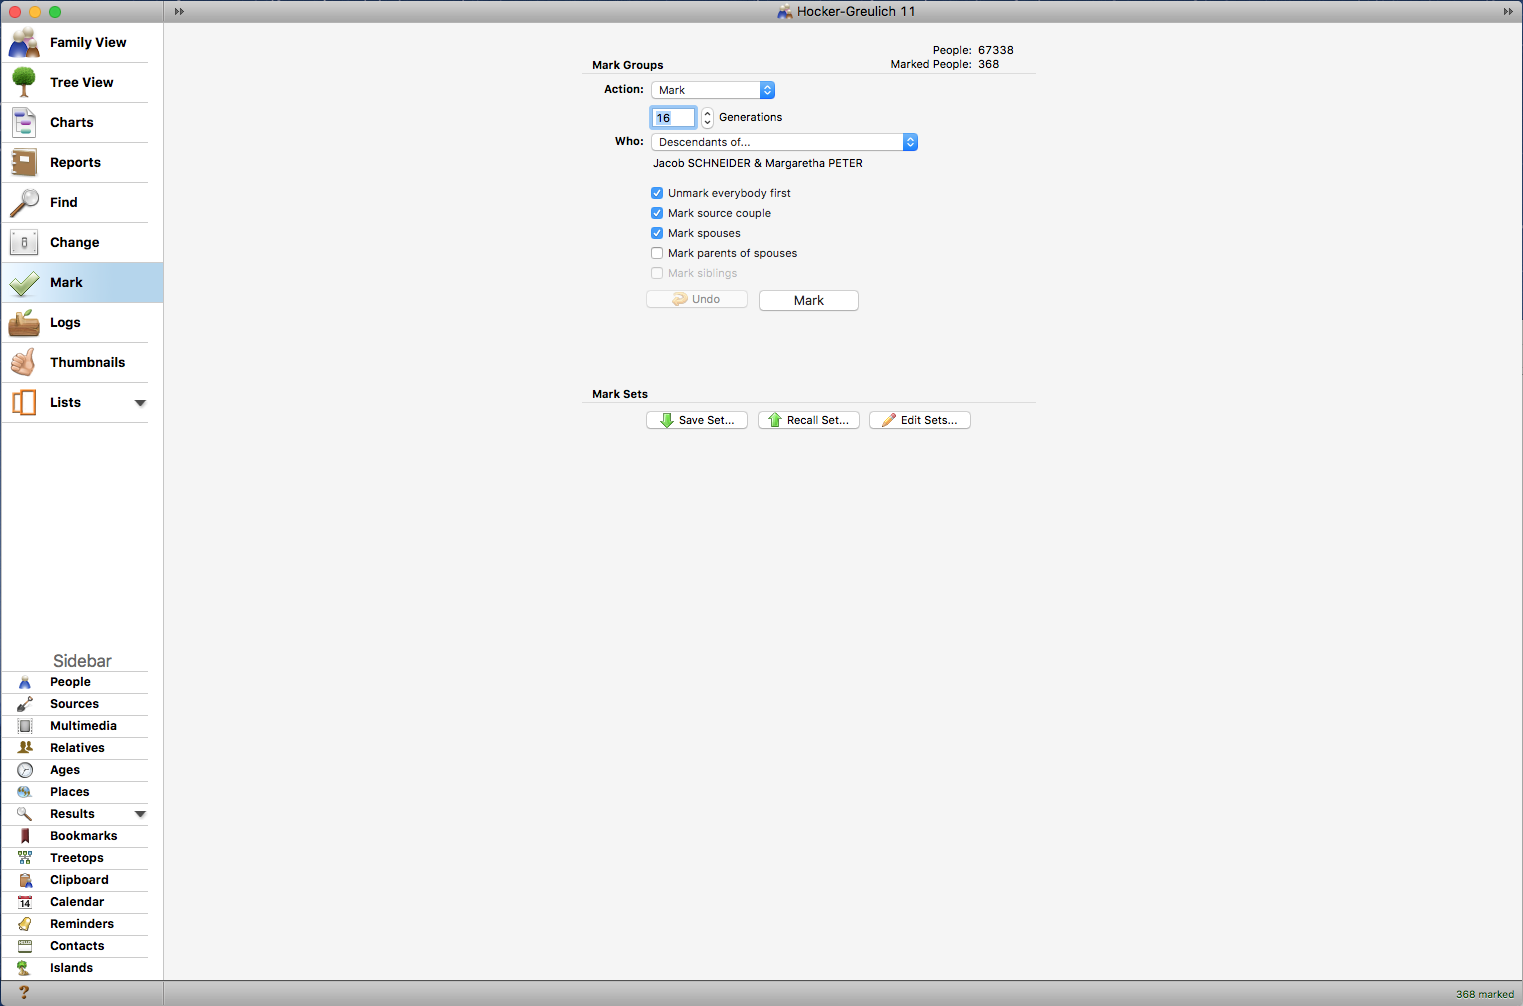
Mark descendants

Mark descendants

When you are on the page of the couple you’ve chosen, go to Mark Groups. Select “Mark” as your action and “Descendants of” as your target group. Be sure to check “Unmark everybody first” to limit your search group to just this subset of the database. Click “Mark.”

Now that you have selected a target group to search, go to “Find.”

Look for marked DNA matches

Look for marked DNA matches

To set your search parameters, first select “Person Marked” under “Attributes” in the conditions pop-up, then select “Yes” in the second menu. This will find all people who are checked in the database.

Add another condition by checking the “And” box. The operator menu allows you to flip this check box between “And” and “Or.”  If you want both parameters to be true, then use “and.” If either conditions should be true, use “or.”

Choose “Child Status” from “Attributes,” then either “Contains” or “Is” in the second menu and type your status in the text box. If you choose “Is” make sure to type in the exact text of the child status. Alternately, I could select “DNA Match checked” from “Flags” or search for text in a notes field. Use whatever method you’re using to tag your DNA matches.

Click “Find” to start the search. The results will appear in the sidebar.

And there it is. The remarkably simple answer to a problem that’s been plaguing me for a while. Why didn’t I think of it sooner?!

Hope this tip helps some of you Reunion users out there.

New in Ancestry Trees – Potential Ancestors

I’ve been seeing references to this new feature on Ancestry Trees in online social media groups to which I belong. I kept checking my account and couldn’t seem to find what they were accessing.

Until this past weekend.

I finally saw it show up in both my public and private trees. This is what it looks like when you are looking at your pedigree view.

Adam Greulich Pedigree - Ancestry Family Tree

Ancestry Trees – Pedigree View

In this example, Ancestry is suggesting a possible mother for my four times great grandfather, Johann Adam Greulich (18 Feb 1751-21 Feb 1808). I had already located this information through FamilySearch—they’ve extracted vital records from some German church books, but I hadn’t entered the information in my private tree on Ancestry.

According to the information I found on FamilySearch, Johann Adam’s parents were Hans Adam (aka Johann Adam) Greulich (1721-1797) and Anna Elisabetha Gerich (1728-1758). What did Ancestry find?

Potential Mother Adam Greulich - Ancestry Trees

Potential mother for Johann Adam Greulich (1751-1808)

It’s a match!

The question I now have is from where did Ancestry get this information? Their records? Family trees? A partnering website? That information is not provided. No source citation is added if you claim that potential ancestor as your own. In this case, they may have even pulled this information from my public tree. The locations are exactly as I entered them, not Ancestry’s suggested location.

According to posts online, these potentials should also show up in the profile view of an individual in your tree. So far, I haven’t seen that.

What do I think of this feature?

I think it’s pretty cool. If it’s accurate. As with any information you find, you need to be able to assess it and verify it. Without context, without knowing where the information comes from, you can do neither. I’ve already seen some that I can dismiss just by date and location alone.

I’m going to consider these potential ancestors—as I do a lot of what I find—a research suggestion. This means I’ll add the individual(s) to my research to-do list for further digging. Once I’ve verified that it’s correct, I can analyze the source and the information within the context of what else I know about the family, comparing it to other information I may find. Hopefully, this will be enough to determine whether or not the relationship—as displayed—is accurate.

I hope that these potentials turn out to be correct. I like adding ancestors to my pedigree chart. I like fitting the pieces together and making connections between families and places in far-off countries.

Ultimately, however, it’s just a start. Names, dates, locations alone are not all that interesting in the long run. There’s so much more to learn.

Amazon Associates Link Builder Plugin How to Set It Up and Use It

Amazon recently released a beta version of its first official free WordPress plugin for the Amazon Associates Program. It allows WordPress users to easily search for products in the Amazon catalog and add real-time information to their blog post. I’m going to show you how to set it up and add Amazon products.

In the past, if I wanted to include an affiliate link to a product on Amazon, I opened a Amazon Associates in another window and logged in. Then I’d search for the product in Amazon’s link builder tool and copy the link that it generated back into my post text. Using this plugin, I can do all that from within my WordPress post.

Setting It Up

It’s not terribly difficult, but it may be intimidating to the average non-techie. I would recommend keeping the instructions page open in another browser window and referring back to it. The set-up only took a few minutes—once I followed the directions and stopped trying to wing it. 😉

Install the Plug-In

You’ll want to install the plugin on your self-hosted WordPress site. If you’ve done it before, skip ahead. If you don’t know how, here’s some information on how to do it, complete with an instructional video.

Once the plugin is installed and activated, you’ll come to the settings page, like this:

Amazon Associates Link Builder plugin settings page

You’ll need to insert the two keys from the next step in the first two fields (yellow). Your associate ID from Amazon Associates goes into the third field. Select a default associate ID, marketplace and template, then save your changes. You’ll need to check that you read the conditions before you’ll be able to save. It’s a short page, so you’ve really got no excuse to read it first!

Get Your API Keys

First, you need to be a member of the Amazon Associates program. If you’re not already, you’ll need to sign-up. If you are, go ahead and log-in.

Next, you’ll need to sign-up for the Amazon Product Advertising API from your Amazon Associates account. Select “Product Advertising API” from the “Tools” menu from within your Associates account (as below).

Amazon Product Advertising API

Product Advertising API

There is a “sign-up now” button on that page that will take you through the process. Once you’ve submitted the form and been approved, select “Manage Your Account” from the “Success” page.

Follow the instructions on this page from #6. After you get to the Access Keys page, click on “Create New Access Key.” There will already be one created by joining. Create a new one for the API. This confused me for a little bit until I read the instructions. Download the file. It will contain the keys you need to set up the plugin.

Now go back to WordPress and enter the required information in the plugin’s settings page and save it. Now you can get started using the plugin.

Using the Plugin

Once the plugin is all set-up, you can start adding Amazon products to your post or page. Here’s how the edit screen looks with the plugin activated and set-up.

WordPress interface with Amazon plugin

The plugin adds a search box to the post interface as show in the image above. Don’t have the second title field? That’s okay. It’s only there because I’ve got a subtitles plugin installed that adds that field.

To start inserting a product or products, enter a keyword in the field beside the Amazon logo, and click search. You can enter a keyword, title, author, manufacturer, etc. I entered my name and here’s what I got back:

Amazon Associates Link Builder plugin search for Kristen Hocker

Only three of those are really what I’m looking for, but… I can select the products I want by clicking on each one, and then the type of template I want to insert, the associate ID (if I had more than one), and the Amazon marketplace. Here are examples of each of the templates using these product(s). 1

Product Carousel:

Product carousel

Product Ad:

Product ad

Product Grid:

Product grid

Amazon Associates Link Builder plugin price link

You can also set-up your own templates. I did a quick clone of the “Price Link” template, and used just the product title instead of just the price. I wanted to be able to insert a book title into existing text.

Amazon Associates Link Builder plugin Templates

Here’s what the output looks like used within a sentence:

Amazon Associates Link Builder plugin custom template

It inserted the book title and series information. The shortcode looked like this in my text:

Amazon Associates Link Builder shortcode inserted into text

Conclusions

The plugin is still in beta, so there are still updates and changes to come. Amazon is looking for feedback. You can read more, including FAQs, and see more screenshots on the WordPress site.

The set-up is a little more involved than most WordPress plugins, but that’s the cost of working with an API. Still it wasn’t terribly time-consuming, and if you follow directions, not difficult at all.